Tag Archives: Recipes

Martini Madness

The Best Of The Best

Writing this post was so much fun that we really had to apply some strict discipline in order to keep it professional.

Before heading over to Maui for a while, we decided to sample some of what Phoenix/Scottsdale has to offer. What could be more fun than sampling Martinis and sharing the recipes?

Our first stop was the Soul Cafe in North Scottsdale. This is already one of our favorite spots and the perfect place to start our bar tour.

Soul Cafe

2015-04-16_14-42-00

April 10, 2015, Happy Hour

The atmosphere is laid back and down to earth. The staff is friendly and casual. Sheila, the owner, stopped by for a few minutes to chat. The very excellent bartender, Conor, was kind enough to share the recipes of the drinks he recommended. Thank you, Conor!

1.  Hot Marilyn

Cut strawberries

Muddled Jalapenos

Mint & lime flavoring to taste, a few drops are sufficient (you can muddle fresh mint with lime rinds if you don’t have flavoring)

1/2 oz Strawberry Puree

1 1/2 oz Skyy Strawberry Vodka

Muddle the jalapenos (and  the fresh mint with lime rinds if you’re going to use them)  in the shaker, add ice, vodka , mint, lime and puree. Shake, strain and pour. Float the sliced strawberries on top and add a sliced jalapeno to the rim.

2.   Coconut Martini 

1/2 oz Vanilla

2 oz Coconut Vodka

Splash of pineapple juice

1/2 oz Cake Vodka

1/2 oz of heavy cream or half and half, depending on your taste

Toasted coconut

Pour the liquids over ice into a shaker. Spin the rim of the martini glass in simple syrup and dip the sticky rim into the toasted coconut. Shake, strain and pour.

This is a high octane drink! It is so tasty that you can easily down three of them before you even feel the first one. Eat something with it.

Onward and upward!

Roy’s Desert Ridge

2015-04-16_14-50-24

April 15, 2015, Happy Hour

Next on our list is Roy’s Desert Ridge at the J. W. Marriott Hotel. Back in January we posted an article on Roy’s cuisine. Now it’s time to comment on their drinks.

We started going to Roy’s in Hawaii when the first one was opened in Hawaii Kai on Oahu  in 1988 and were thrilled when one was opened in Phoenix .

In a fitting send off to tax day, what better place than the bar at Roy’s? The atmosphere of the bar, restaurant and grounds are as close to a Hawaiian resort as one can get without actually being in Hawaii. The bartenders, Robert Holditch and Kenny Carlson were great and the restaurant manager, Chris Karkoski was very gracious and informative.

1.  Roy’s Hawaiian Martini

This is Roy’s signature martini and the recipe is for a batch that serves six. If you’re going to serve this at a party, it needs five days advance preparation prior to serving and believe me, it’s worth it!

1 Ripe pineapple

2 Cups of Skyy Vodka

1 Cup of Malibu Coconut Rum

1 Cup of Stoli Vanil

2  oz of simple syrup

Slice the pineapple into one inch pieces and store the slices in a gallon container. Thoroughly blend the Skyy Vodka, Malibu Coconut Rum, Stoli Vanil and the simple syrup. Pour the mixture over the pineapple slices. Let the whole thing sit at room temperature for five days to infuse the flavor. When it’s time to serve, pour over ice, shake and strain into a martini glass. Garnish with a wedge of fresh pineapple leaving the skin on the wedge. Yum!

2.  1988

Roy Yamaguchi opened his first restaurant in Hawaii in 1988. This drink is in honor of that day.

1 1/2 oz Finlandia Grapefruit Vodka

1/2 oz Patron Citronge Liqueur

1/2 oz Soho Lychee Liqueur

1/4 oz Pomegranate juice

1/4 oz Fresh grapefruit juice

Shake, strain and pour. Drop in a whole lychee to complete. Some of the brand names may be hard to find, if so, use common sense substitutes.

Moving right along. Continue reading Martini Madness

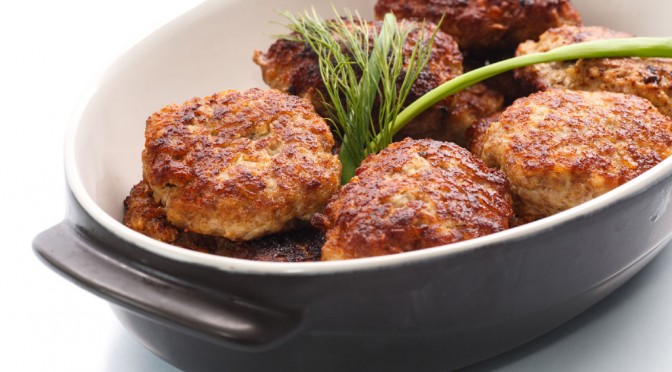
My Mother’s Famous Meatballs

I recently posted a recipe for gravy. This recipe is the companion to the gravy recipe. These are really good!

Meatballs

Ingredients

1lb-Chopped veal

1lb-Chopped beef

1/2lb-Chopped pork

½ tsp-salt

1 tsp-pepper

2 tblsp-Grated Romano cheese

2 tblsp-Pine nuts

Fresh Parsley to taste

2-eggs

2-Cloves of crushed, fresh garlic

½ loaf-stale Italian bread

Olive oil

 First: Soak the stale bread in water and when thoroughly soaked, peel off the crust and squeeze with all your might until all the water is removed.

 Second: With very clean hands, mix the meats and all the other ingredients together until you have a nice, well-mixed mound of meat.

 Third: Heat a large frying pan until it is very hot. When the pan is sufficiently hot pour in the olive oil (about 1/8 of an inch deep). When a drop of water can pop in the oil you are ready to cook.

 Fourth:  Keeping your hands slightly wet with water, form the meatballs. Not completely round but slightly oval so they will cook through. Place them in the hot oil and when they are browned on one side turn them over and brown the other side.

Enjoy!

Visit us at: www.Etsy.com

Rugelach

Brought to you by:  toriavey.com

Ahhh, rugelach. You’d be hard-pressed to find a Jewish dessert that is more beloved than sweet, flaky rugelach. Yiddish for “little twists” or “rolled things,” rugelach have become a popular dessert in America, enjoyed by Jews and non-Jews alike. They descend from an Eastern European pastry known as kipfel, which is a croissant-like cookie made with flour, butter, sour cream, sugar, and yeast. Sometimes kipfel are filled with fruit or nuts, sometimes not. In the early 20th century, American Jewish cooks took the concept of kipfel and added cream cheese to the dough, resulting in the delicious rugelach we know and love today.

Rugelach are often served on Jewish holidays like Hanukkah and Shavuot, though of course they can (and should!) be made throughout the year. Our family typically serves them during Rosh Hashanah, when sweet foods are made to signify a sweet new year. The rolled shape is similar to the spiral challah served at Rosh Hashanah, which symbolizes the cyclical nature of a year. Some people roll rugelach into a strudel-like form, then slice it to make spiral-shaped cookies. In today’s blog, I’m going to share the method for creating the more popular crescent-shaped cookies.

While rugelach filling recipes vary greatly, the dough most American bakers use for rugelach is pretty standard, comprised of equal amounts of flour, cream cheese, and butter. I add a bit of sour cream, sugar, and salt to mine because I like to shake things up. I’m a rugelach rebel! Actually, many people use sour cream in their dough instead of cream cheese, which is more similar to the way kipfel are made. I like to add both because I love the way the dough bakes up– crispy on the outside, soft and flaky and scrumptious on the inside. You’ll love it too. Promise.

I wish I could say that this recipe is healthy, but alas, it is just the opposite. That is, unless you consider fat, sugar, and starch to be healthy– and they might be, depending on how you look at it. After all, tasty treats in moderation are certainly good for the soul. I don’t recommend futzing with the recipe too much by substituting lowfat ingredients, since it’s the fat in the dairy products that ultimately makes these cookies so flaky and delicious. If you do try modifying the recipe for health reasons, let me know how it turns out for you– I’d love to hear! For the rest of us making full-fat rugelach, don’t worry about it too much. These cookies bake up fairly small, so you can treat yourself to a couple and not feel too terribly guilty. Life is there to be lived, am I right??

Recommended Products

DOUGH INGREDIENTS

  • 2 sticks (1 cup) unsalted butter
  • 8 oz. cream cheese
  • 1/4 cup sour cream
  • 2 cups all purpose flour
  • 1/4 tsp salt
  • 2 tbsp granulated sugar

FILLING INGREDIENTS

  • 1 1/2 cups chopped walnuts or pecans
  • 1 1/4 cups semi-sweet chocolate chips
  • 1/2 cup berry preserves (raspberry, strawberry, or blackberry)
  • 1/4 cup brown sugar

EGG WASH INGREDIENTS

  • 1 egg
  • 1 tsp water
  • 1/4 cup granulated sugar
  • 1 1/2 tsp cinnamon

YOU WILL ALSO NEED

Food processor or electric mixer, plastic wrap, parchment paper, cookie sheets, rolling pin and surface, skillet, 9 inch cake pan (optional)

Servings: 40 large rugelach or 60 small rugelach

Kosher Key: Dairy

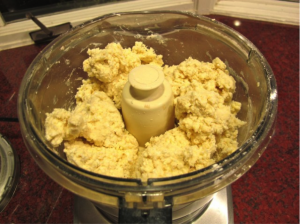
Chop cold butter and cream cheese into smaller pieces. Put pieces into your food processor along with sour cream, flour, salt, and sugar. Pulse together ingredients until a crumbly dough forms and begins to fall away from the sides of the processor. Don’t overprocess; the dough should look crumbly, like cottage cheese.
Rugelach I

If you don’t have a food processor: let the butter and cream cheese come to room temperature. Using a stand mixer or hand mixer, cream the butter and cream cheese together with the sour cream. In a separate bowl, sift together the flour, salt, and sugar. Slowly add the dry mixture to the wet mixture, mixing constantly, until dough holds together and begins to pull away from the sides of the bowl. Don’t overmix. Pour dough onto a lightly floured rolling surface…

Rugelach II

and form into a rough ball shape.

Rugelach III

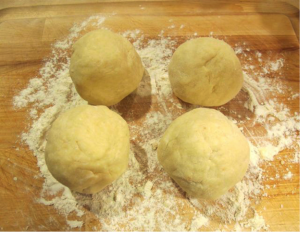
Divide the ball into four equal pieces and form those pieces into rough balls.
Rugelach IV

Cover each ball with plastic and place in the refrigerator. Refrigerate dough balls for at least 1 1/2 hours, for up to 48 hours.

In a skillet, toast the chopped nuts over medium heat until fragrant.

Rugelach Vg

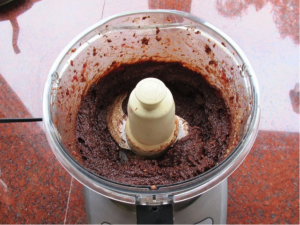
Pour the toasted nuts into a food processor along with the chocolate chips, berry preserves, and brown sugar. Pulse together until a thick, coarse paste forms. Reserve.
Rugelach VI

Combine the cinnamon and sugar in a small bowl; reserve. Beat your egg wash with water; reserve.

Preheat oven to 375 degrees F. Lightly flour your rolling surface and rolling pin. Take one portion of the dough out the refrigerator (keep the rest of the dough cold until ready to use). Roll out the dough to about 1/8 inch thickness. You may need to use the rolling pin to pound out the dough a bit at the beginning; the dough will be very firm and cold, but will become more pliable as it starts to warm. Just keep rolling with firm, even pressure, and eventually it will look like this:

Rugelach VII

Lift the dough gently from the rolling surface (it may stick a bit) and re-flour your surface beneath the dough.

Rugelach VIII

Replace the dough onto the newly refloured surface. Use a round 9″ cake pan as a guide to make a nice, smooth imprint of a circle in the dough.

Cut the dough into a large circle, following the shape of the cake pan. If you don’t have a cake pan, just guesstimate the size of the circle and cut it as smoothly as you can.

Rugelach X

Form the trimmed excess dough into a small ball. Wrap it in plastic and reserve in the refrigerator, adding to the ball with each batch that is made.

Take 1/4 of the filling (about 4 tbsp) and place it in the center of the circle. Spread it very thin across the surface of the dough; a thick layer of filling will make your cookies expand and burst. You can use your fingers to make the spreading easier; I like to use my palm to flatten and even out the filling. Leave about an inch around the edges of the circle.

Cut the circle into 8 equal triangles by first cutting the circle in half…then quarters…then halve the quarters to make eighths.

If you prefer to make smaller bite-sized cookies, divide each quarter into three to make 12 equal triangles.

Rugelach XIRugelach XIV

Rugelach XIX


Roll each triangle, starting from the wide flat end and rolling towards the narrow point.

Press the end point into the cookie to secure it. Place the rolled cookies onto a parchment lined cookie sheet, end point down. Leave an inch between the cookies, as they will expand slightly during baking.
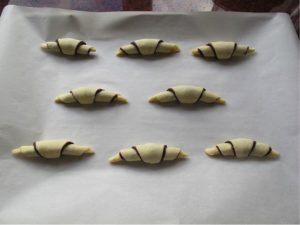
Rugelach XX

When you are ready to bake, brush the top of each cookie with egg wash…
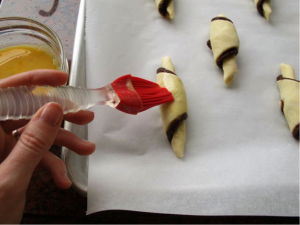
Rugelach XXI

then sprinkle lightly with cinnamon sugar.
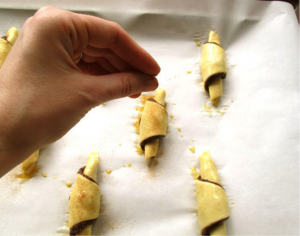
Rugelach XXII

Place cookies in the oven and let them back for about 25 minutes, or until golden brown.

Rugelach XX


Roll out your next batch of cookies while this batch is baking. When the cookies are golden brown, remove from the oven and let them cool on a wire rack.

If you’d prefer to bake more than one batch of cookies at a time, you can store batches of rolled unbaked cookies (without egg wash) on a cookie sheet in the refrigerator. Egg wash and dust them with sugar just prior to placing them in the oven.

When you’re finished making cookies from the four dough balls, make a smooth ball from the leftover dough trimmings you’ve reserved and roll it out to make your fifth batch.

These cookies taste amazing served warm and fresh from the oven. They’ll keep for a few days in a tightly sealed container. You can rewarm them in the microwave if you want to. Also, feel free to use this dough recipe with other rugelach fillings. If you’re using a fruit-only filling, make sure it’s an oven safe variety for pastry baking. Using simple jam or preserves alone (without firming them up with other ingredients) tends to make a runny filling that flows out of the cookies, which makes for a goopy mess. If you’ve never made these cookies before, start with my filling– it’s really yummy, promise!

Happy Holidays!

Visit us at:  www.Etsy.com


October 2015


Fall is finally arriving in The Valley of the Sun and none too soon. This is the most pleasant time of the year to be here and the snowbirds are beginning to arrive before winter sets in .

Oak Creek
Oak Creek

One of the really good things about the fall season is knowing that Starbuck’s Pumpkin Spice is back. Never tried it? Check it out!

Pumpkin Spice
Pumpkin Spice Latte


Fall in Arizona is also the best time of the year to visit the many arts & crafts fairs throughout The Valley. One of the best floating arts & crafts fairs is Briar Patch Marketplace. You can visit their website at: www.briarpatchmarketplace.com

If you have ever considered creating art using the medium of watercolor, Kathy B. has written an article on  Getting Started With Watercolor.  You can also view some of her work at:  www.Etsy.com

We have added a wonderful fall recipe for Stuffed Peppers that has been handed down in our family over the years.

And as always there are a few Jokes & Stories from readers and from around the web. Feel free to contribute by email at:

[email protected]

In This Month’s Issue

Happy Halloween!

Visit us at: www.Etsy.com 


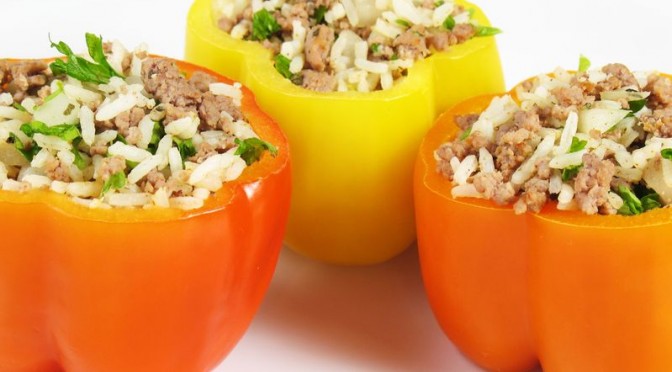
Stuffed Peppers

This takes some time and a little effort to prepare, but it is well worth it.

What you need

  • A nice sized stew pot and cover
  • 4 well shaped, symmetrical peppers (green, red, yellow or a combination)
  • 2 large eggs
  • 1 cup of Progresso Italian Style breadcrumbs
  • 2 Garlic cloves
  • 1 cup of chopped spinach (frozen works great – thawed and drained)
  • 2 cans of chicken broth
  • 1/4 cup of grated parmesan cheese
  • 1/2 tsp of salt
  • 1tsp of black pepper
  • 2tsp of parsley flakes
  • 1tsp basil
  • Olive oil

Serves 4

First

Cut the tops off the peppers and core them. Be sure not to leave any seeds or white spines. Rinse thoroughly and set aside.

Second

Finely chop the garlic and combine with eggs, breadcrumbs, spinach, cheese, salt, pepper, parsley, parmesan and basil. Knead into a moist, well mixed mound.

Third

Stuff each pepper to about a 1/4 inch below the top. Insert a sliver of garlic in the center of each pepper and sprinkle some grated parmesan on top.

Fourth

Pour the broth into the stew pot and place the peppers upright in the pot and drizzle some olive oil over each one. Cook 30-40 minutes over medium heat until the peppers are soft but not mushy. The pot must be covered and the peppers basted frequently with the broth. Remove the peppers and let them settle for a few minutes.

This dish is very, very filling and need only be served with a salad, French or Italian bread and a nice Chianti

divertiti!

Visit us at:  www.Etsy.com

September 2015

Well, September has finally arrived and soon things will be cooling down here in Metro Phoenix. This has been a blazing hot three months with unusually high humidity. For whatever reason, the summers seem to be getting hotter.

Hope you all had a great summer wherever you live!

Blazing Sun
Hot Summer Sun

For those of you who never met our two dogs,  I will be introducing them in a brief article called Puppy Love.  A little bit about them and some things we learned from them.

You can also find a nice quick and delicious recipe for Caprese Salad that looks pretty and can stand alone as a main course.

And as always there are a few Jokes & Stories from readers and from around the web. Feel free to contribute by email at:

[email protected]

In This Month’s Issue

Happy Labor Day!

Visit us at: www.Etsy.com 

Editors note

On Friday, September 11th, please take a moment to remember all those who were lost on September 11th 2001.

Memorial Ribbon

Peace!

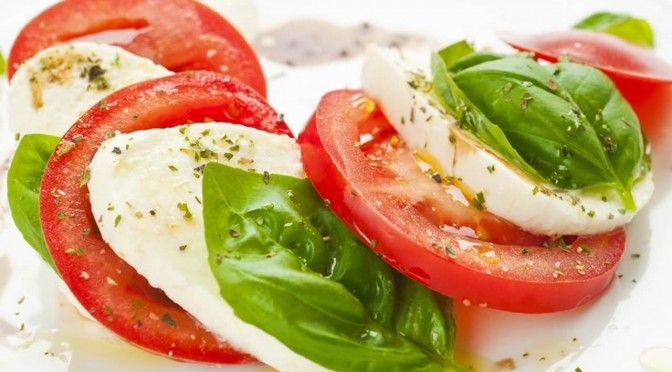
Caprese Salad

I love this dish! It is so very easy to prepare and very satisfying as either an appetizer or entree.

What you need

  • A nice sized serving platter
  • 1lb of fresh mozzarella
  • 3 Large , ripe, firm tomatoes
  •  A fistful of fresh basil(enough for about 12 good sized leaves)
  • 24 black, pitted olives
  • A small jar of sliced roasted peppers in olive oil
  • 12 Artichoke hearts in olive oil
  • Olive oil
  • Balsamic vinegar
  • Salt
  • Ground pepper
  • Oregano

Serves 4-6

First

Cut the mozzarella into 12 slices about 1/4 inch thick and distribute the slices evenly around the serving platter. Sprinkle with a little salt and ground black pepper.

Second

Cut the ends off of the tomatoes and put them aside. Carefully slice the tomatoes into 4 thick quarters so that you are left with 12 healthy slices.

Third

Place the sliced tomatoes on top of the mozzarella slices and sprinkle with a little salt and some oregano. Place a leaf of fresh basil on top.

Fourth

Chop up the ends that were cut from the tomatoes and use them as a base for the black olives. Place the black olives and chopped tomatoes, roasted peppers and artichoke hearts in the center of the serving platter. Coat the basil, tomatoes and mozzarella with some olive oil and balsamic vinegar and you are ready to serve. You’ll need steak knives and forks.

A nice crusty loaf of warm bread and a bottle of wine tops things off.

Enjoy!

Visit us at: www.Etsy.com


July 2015

Okay, okay. In the last blog I indicated that I wouldn’t be posting again until after Labor Day. Well, as I am writing this (June 18th), the temperature in Scottsdale is 115 degrees (but it’s a dry heat, yeah, yeah, yeah) and the streets are mostly deserted. So, who wants to go outside anyway?

Old Town
Old Town Scottsdale

Over the course of a few days, we decided to do a summertime sampling of some fast food joints to see what’s new, read Fast Food Fandango for the lowdown.

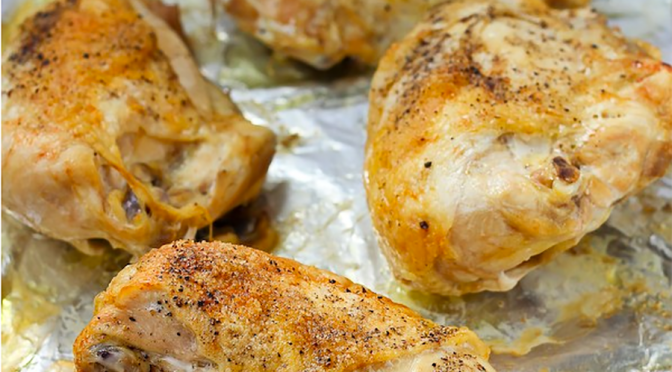
You can also find a great summer recipe for Baked Chicken that’s pretty easy to make.

And as always there are a few Jokes & Stories from readers and from around the web. Feel free to contribute by email at:   [email protected]

In This Month’s Issue

Have a great summer!

Peace!

Visit us at: www.Etsy.com 

Baked Chicken With Onions, Peas and Potatoes

 A Great Summer Dish

I inherited this recipe from my mother a long time ago. It’s been tweaked a little bit over the years and the result is a tasty  and fairly easy to prepare meal.

What you need

  • A broiler pan (the kind you find in most ovens)
  • Aluminum foil
  • Canola oil cooking spray
  • 4-Good sized bone-in chicken breasts
  • 2-Large baking potatoes
  • 4-Cloves of finely chopped garlic
  • 1-Can of peas
  • 1-Large sweet onion
  • Olive oil
  • 8-Thin pats of real butter
  • Salt and ground black pepper
  • Oregano

First

Pre-heat your oven to 350 degrees. Very important!

Second

Line the bottom of the broiler pan with aluminum foil for easy clean up. Spray with the cooking oil so that the breasts don’t stick.

Third

While the oven is heating up, rinse each breast under cold running water and pat the excess water off with paper towels.

Fourth

Place the breasts on the cooking spray coated pan and pour some olive oil over each breast and rub it in.

Salt and pepper to taste. Add some of the chopped garlic on top of the breasts and sprinkle with oregano.

Fifth

Cut the potatoes into quarters leaving the skin on. Slit each piece and place a small pat of butter in the slit. Distribute the potatoes among the chicken breasts.

Slice the sweet onion into rings and put the rings in with the chicken breasts and potatoes.

Place the pan in the pre-heated oven for 45 minutes.

After 45 minutes pour the peas and the liquid in the can over the everything and cook for another 15 minutes. Start checking the chicken breasts at this point. You don’t want them to overcook or undercook. Make a small cut at the meatiest part of one of the breasts. The chicken should be moist but, not pink.

You really don’t need a side dish with this as everything is right there in the pan.

A good white wine adds the finishing touch.

Enjoy!

Visit us at: www.Etsy.com


June 2015

Aloha!

A good part of the month of May was spent on Maui. Although this trip was primarily for business, we did manage to get some touring in and to check out some of the great restaurants, inns and resorts, some for the first time and some old favorites. We will be returning in October for what may turn out to be our last visit before making the final move.

Also in this month’s blog is a quick and easy recipe for broiled tilapia that is both healthy and tasty.

In our  Pull My Finger post, we will be sharing jokes from around the web and jokes that you send in. Feel free to contribute by email at:   [email protected]

In This Month’s Issue

We hope you enjoy our blog magazine.

See you all after Labor Day.

Peace!

Visit us at: www.Etsy.com