Tag Archives: Food

Pizzelle

Brought to you by:  dimaggiofamily.com

PIZZELLE
Pronounced “pit-sel”

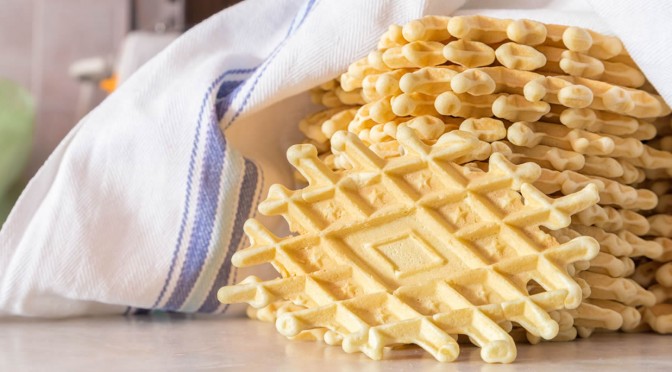
Pizzelles are the oldest known cookie.  It is generally believed they originated in the Abruzzo region of south-central Italy in ancient times to mark an annual celebration. Initially baked over an open fire with relatively simple but effective irons, the early pizzelles often were proudly embossed with the family crest or some hint of the village of origin.  The name comes from the Italian word pizze for round and flat. Pizzelle makers are typically called irons, because the first ones were just that- irons that were forged by blacksmiths for the local women.

Pizzelle Iron
Cucina Pizzelle Iron

In some parts of Italy, the irons were embossed with family crests and passed down to each generation. Over time it became tradition to use pizzelles to celebrate any holiday or festive occasion, but inevitably there were pizzelles for everyone at Christmas and Easter.  In addition, today they are often found at Italian weddings, alongside other traditional pastries such as cannoli and traditional Italian cookies


Traditional Italian Pizzelles

  • 3 eggs, room temperature
  • ¾ cup sugar
  • ½ cup butter melted and cooled
  • 2 tsp. baking powder
  • 1 tsp. vanilla
  • ½ tsp. anise extract
  • 1 ¾ cups flour

Preparation

In large mixing bowl, beat eggs and sugar.  Add cooled butter, vanilla and anise.  Sift flour and baking powder together and add to egg mixture.   The batter should be stiff enough to be dropped by spoon.  It can also be refrigerated and used later.  Place 1 heaping teaspoon batter on each grid and bake according to directions for your Pizzelle iron.  To keep pizzelles crisp, store in an airtight container.

Two pizzelle may be sandwiched with cannoli cream or hazelnut spread.

Pizzelle Roller
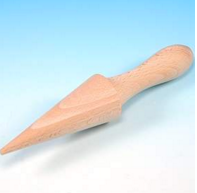
Pizzelle Cone Roller


Pizzelle, while still warm, can be rolled using a wooden dowel to create cannoli shells or shaped into cones for ice cream.

Happy Holidays!

<Back      Next>

         Home


Visit our Etsy store for this Holiday T-Shirt.

Visit our online store at: www.etsy.com

Contact us at: [email protected]


Rugelach

Brought to you by:  toriavey.com

Ahhh, rugelach. You’d be hard-pressed to find a Jewish dessert that is more beloved than sweet, flaky rugelach. Yiddish for “little twists” or “rolled things,” rugelach have become a popular dessert in America, enjoyed by Jews and non-Jews alike. They descend from an Eastern European pastry known as kipfel, which is a croissant-like cookie made with flour, butter, sour cream, sugar, and yeast. Sometimes kipfel are filled with fruit or nuts, sometimes not. In the early 20th century, American Jewish cooks took the concept of kipfel and added cream cheese to the dough, resulting in the delicious rugelach we know and love today.

Rugelach are often served on Jewish holidays like Hanukkah and Shavuot, though of course they can (and should!) be made throughout the year. Our family typically serves them during Rosh Hashanah, when sweet foods are made to signify a sweet new year. The rolled shape is similar to the spiral challah served at Rosh Hashanah, which symbolizes the cyclical nature of a year. Some people roll rugelach into a strudel-like form, then slice it to make spiral-shaped cookies. In today’s blog, I’m going to share the method for creating the more popular crescent-shaped cookies.

While rugelach filling recipes vary greatly, the dough most American bakers use for rugelach is pretty standard, comprised of equal amounts of flour, cream cheese, and butter. I add a bit of sour cream, sugar, and salt to mine because I like to shake things up. I’m a rugelach rebel! Actually, many people use sour cream in their dough instead of cream cheese, which is more similar to the way kipfel are made. I like to add both because I love the way the dough bakes up– crispy on the outside, soft and flaky and scrumptious on the inside. You’ll love it too. Promise.

I wish I could say that this recipe is healthy, but alas, it is just the opposite. That is, unless you consider fat, sugar, and starch to be healthy– and they might be, depending on how you look at it. After all, tasty treats in moderation are certainly good for the soul. I don’t recommend futzing with the recipe too much by substituting lowfat ingredients, since it’s the fat in the dairy products that ultimately makes these cookies so flaky and delicious. If you do try modifying the recipe for health reasons, let me know how it turns out for you– I’d love to hear! For the rest of us making full-fat rugelach, don’t worry about it too much. These cookies bake up fairly small, so you can treat yourself to a couple and not feel too terribly guilty. Life is there to be lived, am I right??

Recommended Products

DOUGH INGREDIENTS

  • 2 sticks (1 cup) unsalted butter
  • 8 oz. cream cheese
  • 1/4 cup sour cream
  • 2 cups all purpose flour
  • 1/4 tsp salt
  • 2 tbsp granulated sugar

FILLING INGREDIENTS

  • 1 1/2 cups chopped walnuts or pecans
  • 1 1/4 cups semi-sweet chocolate chips
  • 1/2 cup berry preserves (raspberry, strawberry, or blackberry)
  • 1/4 cup brown sugar

EGG WASH INGREDIENTS

  • 1 egg
  • 1 tsp water
  • 1/4 cup granulated sugar
  • 1 1/2 tsp cinnamon

YOU WILL ALSO NEED

Food processor or electric mixer, plastic wrap, parchment paper, cookie sheets, rolling pin and surface, skillet, 9 inch cake pan (optional)

Servings: 40 large rugelach or 60 small rugelach

Kosher Key: Dairy

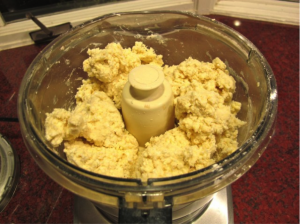
Chop cold butter and cream cheese into smaller pieces. Put pieces into your food processor along with sour cream, flour, salt, and sugar. Pulse together ingredients until a crumbly dough forms and begins to fall away from the sides of the processor. Don’t overprocess; the dough should look crumbly, like cottage cheese.
Rugelach I

If you don’t have a food processor: let the butter and cream cheese come to room temperature. Using a stand mixer or hand mixer, cream the butter and cream cheese together with the sour cream. In a separate bowl, sift together the flour, salt, and sugar. Slowly add the dry mixture to the wet mixture, mixing constantly, until dough holds together and begins to pull away from the sides of the bowl. Don’t overmix. Pour dough onto a lightly floured rolling surface and form into a rough ball shape.

Divide the ball into four equal pieces and form those pieces into rough balls.

Rugelach IV

Cover each ball with plastic and place in the refrigerator. Refrigerate dough balls for at least 1 1/2 hours, for up to 48 hours.

In a skillet, toast the chopped nuts over medium heat until fragrant.

Pour the toasted nuts into a food processor along with the chocolate chips, berry preserves, and brown sugar. Pulse together until a thick, coarse paste forms.

Rugelach VI

Combine the cinnamon and sugar in a small bowl.  Beat your egg wash with water.

Preheat oven to 375 degrees F.  Lightly flour your rolling surface and rolling pin. Take one portion of the dough out of the refrigerator (keep the rest of the dough cold until ready to use). Roll out the dough to about 1/8 inch thickness. You may need to use the rolling pin to pound out the dough a bit at the beginning; the dough will be very firm and cold, but will become more pliable as it starts to warm. Just keep rolling with firm, even pressure.

Lift the dough gently from the rolling surface (it may stick a bit) and re-flour your surface beneath the dough.

Replace the dough onto the newly refloured surface. Use a round 9″ cake pan as a guide to make a nice, smooth imprint of a circle in the dough.

Cut the dough into a large circle, following the shape of the cake pan. If you don’t have a cake pan, just guesstimate the size of the circle and cut it as smoothly as you can.

Form the trimmed excess dough into a small ball. Wrap it in plastic and reserve in the refrigerator, adding to the ball with each batch that is made.

Take 1/4 of the filling (about 4 tbsp) and place it in the center of the circle. Spread it very thin across the surface of the dough; a thick layer of filling will make your cookies expand and burst. You can use your fingers to make the spreading easier; I like to use my palm to flatten and even out the filling. Leave about an inch around the edges of the circle.

Cut the circle into 8 equal triangles by first cutting the circle in half…then quarters…then halve the quarters to make eighths.

If you prefer to make smaller bite-sized cookies, divide each quarter into three to make 12 equal triangles.

Rugelach XIX


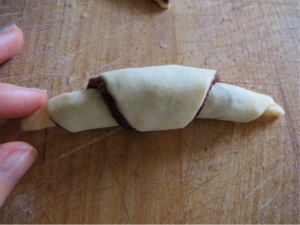
Roll each triangle, starting from the wide flat end and rolling towards the narrow point.

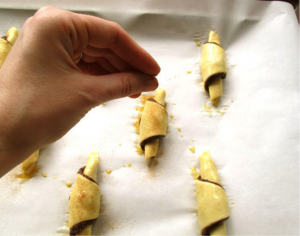
Press the end point into the cookie to secure it. Place the rolled cookies onto a parchment lined cookie sheet, end point down. Leave an inch between the cookies, as they will expand slightly during baking.

Rugelach XX

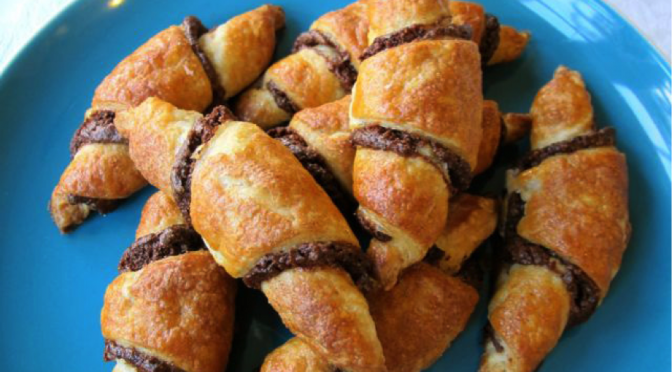
When you are ready to bake, brush the top of each cookie with egg wash then sprinkle lightly with cinnamon sugar.

Rugelach XXI


Rugelach XXII

Place cookies in the oven and let them bake for about 25 minutes, or until golden brown.

Rugelach XX


Roll out your next batch of cookies while this batch is baking. When the cookies are golden brown, remove from the oven and let them cool on a wire rack.

If you’d prefer to bake more than one batch of cookies at a time, you can store batches of rolled unbaked cookies (without egg wash) on a cookie sheet in the refrigerator. Egg wash and dust them with sugar just prior to placing them in the oven.

When you’re finished making cookies from the four dough balls, make a smooth ball from the leftover dough trimmings you’ve reserved and roll it out to make your fifth batch.

These cookies taste amazing served warm and fresh from the oven. They’ll keep for a few days in a tightly sealed container. You can rewarm them in the microwave if you want to. Also, feel free to use this dough recipe with other rugelach fillings. If you’re using a fruit-only filling, make sure it’s an oven safe variety for pastry baking. Using simple jam or preserves alone (without firming them up with other ingredients) tends to make a runny filling that flows out of the cookies, which makes for a goopy mess. If you’ve never made these cookies before, start with my filling– it’s really yummy, promise!

<Back     Next>

           Home

Visit our Etsy store for this Holiday T-Shirt.

Visit our online store at: www.etsy.com

Contact us at: [email protected]


Moscow Mule

I’ve been working at Maui Brewing Company in Kihei now for almost a year. If you’ve checked it out online, or if you’ve ever been to the brewery, you know that there is also a wonderful restaurant at the site. Not only do I get to work with some amazing brewery employees, I also rub shoulders with the tireless restaurant folks on a daily basis.

One day one of the restaurant employees walked by our desks carrying a huge box filled with beautiful copper mugs. “Anyone want a copper mug?” I guess these were extras, or no longer used. Needless to say, looking at all the shiny copper, I piped up “Sure – over here!!!”

Which got me thinking about the cocktails I’ve had in the past in similar copper mugs – Moscow Mules.

Moscow mule is a cocktail made with vodka, spicy ginger beer, and lime juice garnished with a slice or wedge of lime and mint leaves.

Maui Brewing Company 4-pack of Ginger Beer
Maui Brewing Company Ginger Beer

Moscow mules are typically served in copper mugs. Copper is an excellent conductor, meaning that cold or heat spreads rapidly through the material. While the copper material of your mug doesn’t actually make the drink colder, it makes it seem colder than it would if you were drinking it out of a regular glass or mug.

If you’re shopping for copper mugs, be sure to buy food-safe mugs that are not copper on the inside. Copper leaches into acidic foods and poses health risks, yikes!

Ingredients

  • 2 ounces Vodka
  • 4-6 ounces Maui Brewing Ginger Beer
  • 2-3 mint sprigs, plus more for garnish
  • 1 lime for juice, plus more for garnish

Directions

  1. Muddle mint sprigs in the bottom of your copper mug
  2. Add the juice of 1 lime.
  3. Fill mug with ice.
  4. Pour in vodka and ginger beer.
  5. Add garnishes.
  6. Stir and enjoy!

Why are Moscow Mules typically served in copper mugs?

According to Michael Cervin, in an August 2007 article on the Copper Development Association Inc. website:

“Most cocktails require specific glassware for their drinks—the highball and the martini glass, for example—however, the copper mug for the Moscow Mule is a must. If the old stories about the genesis of the drink are correct (they are mostly unanimous with a few variations) then it goes like this. In the early 1940s, John Martin was the president of G.F. Heublein & Brothers, an East Coast food and spirits importer best known for introducing A-1 Steak Sauce to America. Sometime in the 1930s, Martin, in an effort to market the next cocktail craze, purchased a small vodka distillery called Smirnoff for $14,000.

Yes, that Smirnoff. Back then, very few people drank vodka because most had never heard of it, let alone tasted it.

One day, while Martin was visiting his friend Jack Morgan who owned the Cock ‘n Bull pub on the Sunset Strip in Hollywood, he bemoaned the fact that he couldn’t sell his vodka. Morgan complained he couldn’t sell his ginger beer, a side passion of his that saw cases of it sitting in his restaurant’s basement. And a third person (never identified in any of the stories) lamented that she had copper mugs that she either didn’t want or need. Enter the brainstorm. Could all three benefit from combining their losses? The vodka and ginger beer were mixed with a dash of lime juice and served in copper mugs, imprinted with a kicking mule.”

Who knew?

You really need to try it. It’s delicious.

Visit our online store at: www.etsy.com

Contact us at: [email protected]

<Back  Next>

<Home>


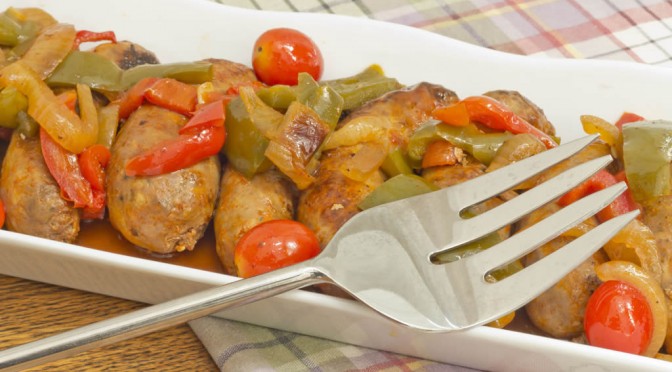
Sausage With Peppers & Onions

A Classic!

This delicious Brooklyn dish is easy to prepare and very satisfying. It is not necessarily a side dish but a meal in and of itself. Makes a great brown bag lunch!

What you need

  • 4-6 Italian sausages. Hot or sweet, you decide. If you live near a Costco, they have some of the best Italian sausage anywhere. Johnsonville is also very good. If you live in an Italian neighborhood then you’ll want to go to a local pork store.
  • A large frying pan
  • Grill
  • Olive oil
  • 2 Green or red bell peppers
  • 1 Medium sweet onion
  • 2 Garlic cloves chopped medium fine
  • 1/2 Tsp salt
  • 1 Tsp black pepper
  • 1/2 Tsp oregano
  • 1/2 Tsp basil
  • 1 Long loaf of Italian bread or crusty French baguette

First

Core and clean the peppers so that there are no seeds and no white rind. Cut them lengthwise into 1/4″ strips.

Second

Cut the ends off the onion and then cut it in half lengthwise and slice so that you have half rings.

Third

Heat the frying pan over medium heat until you can pop a drop of water then add about 1/8″ of olive oil. When you can pop a drop of water in the oil you are ready to fry up the peppers and onions.

Fourth

Saute the garlic on medium heat for about 30 seconds and then add the peppers and onions. Add the salt, black pepper, oregano and basil. Stir everything around often until the peppers and onions are tender. This will take a bit of time.

Fifth

While the peppers and onions are cooking , throw the sausage on the grill and cook them until they are done and have uniform black grill marks all around. Some people like to fry the sausage, I don’t. Frying them is O.K. but it does change the character of the recipe.

Sixth

Take the sausages off the grill and let them cool for a few minutes. Cut them lengthwise and add them to the peppers and onions for about 1 minute. Place the contents of the frying pan into a bowl lined with paper towels to absorb the excess olive oil. You are now ready to serve it up.

This makes a great sandwich and can be served with a side salad and a nice bottle of Chianti.

Enjoy!

Visit our online stores at: www.etsy.com

Contact us at: [email protected]


Pignatelli’s Ellis Island Vinaigrette

Easy To Make

I have been making this family vinaigrette recipe for decades and sometimes bring a bottle of it to friends’ houses when visiting. I like it so much that I thought I would share the recipe with our readers.

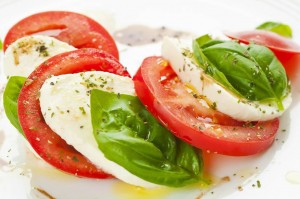
Caprese
Tomato Caprese


What you need

  • A wine bottle or any bottle that will hold about 25oz (750ml)
  • 1 cup balsamic vinegar
  • 1 cup olive oil (not extra virgin)
  • 1 cup bottled or filtered water
  • 2 cloves of finely chopped garlic
  • 1/2 tsp salt
  • 1/2 tsp black pepper
  • 1/2 tsp oregano flakes
  • 1 tsp parsley flakes
  • 1 tsp dried basil

First

Get all of your dry and chopped ingredients into the bottle

Second

Using a funnel, pour the water, olive oil and  vinegar into the bottle

Third

Tightly cap or cork the bottle and shake it well. Let the mixture sit for a day so that the flavors can blend.

This will go great with a caprese salad or just a plain old lettuce and tomato salad. You’ll want to have some fresh, crusty bread for mopping.

Enjoy!

Pignatellis Label Opt

Visit our online stores at:  www.Etsy.com

Contact us at: [email protected]

Fast Food Fandango

McDonald’s

McDonald's
Pima Raod

McDonald’s is such a fixture in America that we pretty much take it for granted. Ya get hungry, ya stop, get a burger, fries, a drink and off you go. What could possibly be worth writing about?

Recently, McDonald’s introduced their Sirloin Burger. Guess what? It’s worth writing about. This burger comes in three varieties: Lettuce & Tomato, Bacon & Cheese, Onion & Mushroom. All three are very good.

The Onion and Mushroom was a real surprise. Not something you would expect from a fast food joint. Very tasty. My personal favorite? Bacon & Cheese! 1/3 of a pound of good quality meat, well cooked on a nice bun. It was so filling that the fries seemed to be overkill. But who can resist McDonald’s fries?

As an afterthought, we decided on some dessert (as if we needed it). Two Dipped Ice Cream cones and coffee for under $5.00. The soft vanilla ice cream was covered with a crunchy chocolate dip in a wafer cone. It ain’t gourmet but, pretty darn good.

So sue me, I like McDonald’s.

Arby’s

Arby's
Scottsdale & Shea


It has been a very long time since I visited Arby’s, mostly because the menu was so limited. My, oh my how things have changed. The menu was almost deli like.

Our first thought was to order something on a King’s Hawaiian Sweet Roll. These items were sold out this day so we went to plan B and ordered a couple of deli sandwiches.

Kathy ordered a Reuben Sandwich. This was more than you would ever expect and pretty close to New York deli. It was on marbled rye bread filled with freshly sliced corned beef, melted Swiss Cheese, sauerkraut and Thousand Island dressing. Very, very good!

I had the Smokehouse Brisket on a roll.  My sandwich was topped with smoked gouda, crispy onions, mayo and BBQ sauce. This was not something I would usually order but, the picture looked good and I wasn’t sorry for my choice. Yum!

Both sandwiches came with tasty Arby’s Curly Fries and a large drink and really good service, all for under $20.  This was pushing the fast food price envelope a little but, well worth it.

Burger King 

Burger King
Scottsdale & Thunderbird


Breakfast at Burger King, who knew? Not me.

There were plenty of things on the menu but, once we cast our eyes on the Hot Cinnamon Rolls we stopped reading the menu.

The Otis Spunkmeyer Cinnamon Rolls are made with warm dough filled with cinnamon and topped with cream cheese frosting. If you are on a diet and counting calories, your diet just got shot to hell. These were so good that I almost went back for another order. Discipline prevailed.

Four Otis Spunkmeyer Cinnamon Rolls  and two very good cups of coffee, around $10. What a deal!

Peace, health and prosperity.

Visit us at: www.Etsy.com


Martini Madness

The Best Of The Best

Writing this post was so much fun that we really had to apply some strict discipline in order to keep it professional.

Before heading over to Maui for a while, we decided to sample some of what Phoenix/Scottsdale has to offer. What could be more fun than sampling Martinis and sharing the recipes?

Our first stop was the Soul Cafe in North Scottsdale. This is already one of our favorite spots and the perfect place to start our bar tour.

Soul Cafe

2015-04-16_14-42-00

April 10, 2015, Happy Hour

The atmosphere is laid back and down to earth. The staff is friendly and casual. Sheila, the owner, stopped by for a few minutes to chat. The very excellent bartender, Conor, was kind enough to share the recipes of the drinks he recommended. Thank you, Conor!

1.  Hot Marilyn

Cut strawberries

Muddled Jalapenos

Mint & lime flavoring to taste, a few drops are sufficient (you can muddle fresh mint with lime rinds if you don’t have flavoring)

1/2 oz Strawberry Puree

1 1/2 oz Skyy Strawberry Vodka

Muddle the jalapenos (and  the fresh mint with lime rinds if you’re going to use them)  in the shaker, add ice, vodka , mint, lime and puree. Shake, strain and pour. Float the sliced strawberries on top and add a sliced jalapeno to the rim.

2.   Coconut Martini 

1/2 oz Vanilla

2 oz Coconut Vodka

Splash of pineapple juice

1/2 oz Cake Vodka

1/2 oz of heavy cream or half and half, depending on your taste

Toasted coconut

Pour the liquids over ice into a shaker. Spin the rim of the martini glass in simple syrup and dip the sticky rim into the toasted coconut. Shake, strain and pour.

This is a high octane drink! It is so tasty that you can easily down three of them before you even feel the first one. Eat something with it.

Onward and upward!

Roy’s Desert Ridge

2015-04-16_14-50-24

April 15, 2015, Happy Hour

Next on our list is Roy’s Desert Ridge at the J. W. Marriott Hotel. Back in January we posted an article on Roy’s cuisine. Now it’s time to comment on their drinks.

We started going to Roy’s in Hawaii when the first one was opened in Hawaii Kai on Oahu  in 1988 and were thrilled when one was opened in Phoenix .

In a fitting send off to tax day, what better place than the bar at Roy’s? The atmosphere of the bar, restaurant and grounds are as close to a Hawaiian resort as one can get without actually being in Hawaii. The bartenders, Robert Holditch and Kenny Carlson were great and the restaurant manager, Chris Karkoski was very gracious and informative.

1.  Roy’s Hawaiian Martini

This is Roy’s signature martini and the recipe is for a batch that serves six. If you’re going to serve this at a party, it needs five days advance preparation prior to serving and believe me, it’s worth it!

1 Ripe pineapple

2 Cups of Skyy Vodka

1 Cup of Malibu Coconut Rum

1 Cup of Stoli Vanil

2  oz of simple syrup

Slice the pineapple into one inch pieces and store the slices in a gallon container. Thoroughly blend the Skyy Vodka, Malibu Coconut Rum, Stoli Vanil and the simple syrup. Pour the mixture over the pineapple slices. Let the whole thing sit at room temperature for five days to infuse the flavor. When it’s time to serve, pour over ice, shake and strain into a martini glass. Garnish with a wedge of fresh pineapple leaving the skin on the wedge. Yum!

2.  1988

Roy Yamaguchi opened his first restaurant in Hawaii in 1988. This drink is in honor of that day.

1 1/2 oz Finlandia Grapefruit Vodka

1/2 oz Patron Citronge Liqueur

1/2 oz Soho Lychee Liqueur

1/4 oz Pomegranate juice

1/4 oz Fresh grapefruit juice

Shake, strain and pour. Drop in a whole lychee to complete. Some of the brand names may be hard to find, if so, use common sense substitutes.

Moving right along. Continue reading Martini Madness

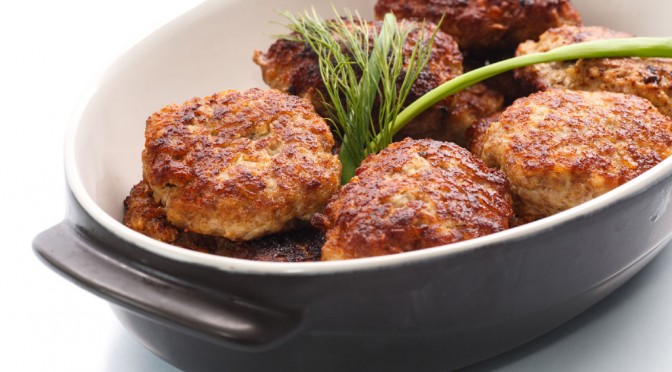
My Mother’s Famous Meatballs

I recently posted a recipe for gravy. This recipe is the companion to the gravy recipe. These are really good!

Meatballs

Ingredients

1lb-Chopped veal

1lb-Chopped beef

1/2lb-Chopped pork

½ tsp-salt

1 tsp-pepper

2 tblsp-Grated Romano cheese

2 tblsp-Pine nuts

Fresh Parsley to taste

2-eggs

2-Cloves of crushed, fresh garlic

½ loaf-stale Italian bread

Olive oil

 First: Soak the stale bread in water and when thoroughly soaked, peel off the crust and squeeze with all your might until all the water is removed.

 Second: With very clean hands, mix the meats and all the other ingredients together until you have a nice, well-mixed mound of meat.

 Third: Heat a large frying pan until it is very hot. When the pan is sufficiently hot pour in the olive oil (about 1/8 of an inch deep). When a drop of water can pop in the oil you are ready to cook.

 Fourth:  Keeping your hands slightly wet with water, form the meatballs. Not completely round but slightly oval so they will cook through. Place them in the hot oil and when they are browned on one side turn them over and brown the other side.

Enjoy!

Visit us at: www.Etsy.com

Rugelach

Brought to you by:  toriavey.com

Ahhh, rugelach. You’d be hard-pressed to find a Jewish dessert that is more beloved than sweet, flaky rugelach. Yiddish for “little twists” or “rolled things,” rugelach have become a popular dessert in America, enjoyed by Jews and non-Jews alike. They descend from an Eastern European pastry known as kipfel, which is a croissant-like cookie made with flour, butter, sour cream, sugar, and yeast. Sometimes kipfel are filled with fruit or nuts, sometimes not. In the early 20th century, American Jewish cooks took the concept of kipfel and added cream cheese to the dough, resulting in the delicious rugelach we know and love today.

Rugelach are often served on Jewish holidays like Hanukkah and Shavuot, though of course they can (and should!) be made throughout the year. Our family typically serves them during Rosh Hashanah, when sweet foods are made to signify a sweet new year. The rolled shape is similar to the spiral challah served at Rosh Hashanah, which symbolizes the cyclical nature of a year. Some people roll rugelach into a strudel-like form, then slice it to make spiral-shaped cookies. In today’s blog, I’m going to share the method for creating the more popular crescent-shaped cookies.

While rugelach filling recipes vary greatly, the dough most American bakers use for rugelach is pretty standard, comprised of equal amounts of flour, cream cheese, and butter. I add a bit of sour cream, sugar, and salt to mine because I like to shake things up. I’m a rugelach rebel! Actually, many people use sour cream in their dough instead of cream cheese, which is more similar to the way kipfel are made. I like to add both because I love the way the dough bakes up– crispy on the outside, soft and flaky and scrumptious on the inside. You’ll love it too. Promise.

I wish I could say that this recipe is healthy, but alas, it is just the opposite. That is, unless you consider fat, sugar, and starch to be healthy– and they might be, depending on how you look at it. After all, tasty treats in moderation are certainly good for the soul. I don’t recommend futzing with the recipe too much by substituting lowfat ingredients, since it’s the fat in the dairy products that ultimately makes these cookies so flaky and delicious. If you do try modifying the recipe for health reasons, let me know how it turns out for you– I’d love to hear! For the rest of us making full-fat rugelach, don’t worry about it too much. These cookies bake up fairly small, so you can treat yourself to a couple and not feel too terribly guilty. Life is there to be lived, am I right??

Recommended Products

DOUGH INGREDIENTS

  • 2 sticks (1 cup) unsalted butter
  • 8 oz. cream cheese
  • 1/4 cup sour cream
  • 2 cups all purpose flour
  • 1/4 tsp salt
  • 2 tbsp granulated sugar

FILLING INGREDIENTS

  • 1 1/2 cups chopped walnuts or pecans
  • 1 1/4 cups semi-sweet chocolate chips
  • 1/2 cup berry preserves (raspberry, strawberry, or blackberry)
  • 1/4 cup brown sugar

EGG WASH INGREDIENTS

  • 1 egg
  • 1 tsp water
  • 1/4 cup granulated sugar
  • 1 1/2 tsp cinnamon

YOU WILL ALSO NEED

Food processor or electric mixer, plastic wrap, parchment paper, cookie sheets, rolling pin and surface, skillet, 9 inch cake pan (optional)

Servings: 40 large rugelach or 60 small rugelach

Kosher Key: Dairy

Chop cold butter and cream cheese into smaller pieces. Put pieces into your food processor along with sour cream, flour, salt, and sugar. Pulse together ingredients until a crumbly dough forms and begins to fall away from the sides of the processor. Don’t overprocess; the dough should look crumbly, like cottage cheese.

Rugelach I

If you don’t have a food processor: let the butter and cream cheese come to room temperature. Using a stand mixer or hand mixer, cream the butter and cream cheese together with the sour cream. In a separate bowl, sift together the flour, salt, and sugar. Slowly add the dry mixture to the wet mixture, mixing constantly, until dough holds together and begins to pull away from the sides of the bowl. Don’t overmix. Pour dough onto a lightly floured rolling surface…

Rugelach II

and form into a rough ball shape.

Rugelach III

Divide the ball into four equal pieces and form those pieces into rough balls.
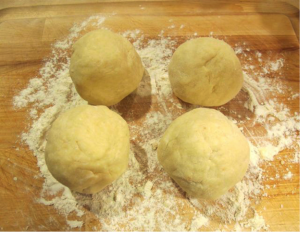
Rugelach IV

Cover each ball with plastic and place in the refrigerator. Refrigerate dough balls for at least 1 1/2 hours, for up to 48 hours.

In a skillet, toast the chopped nuts over medium heat until fragrant.

Rugelach Vg

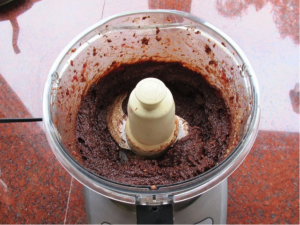
Pour the toasted nuts into a food processor along with the chocolate chips, berry preserves, and brown sugar. Pulse together until a thick, coarse paste forms. Reserve.
Rugelach VI

Combine the cinnamon and sugar in a small bowl; reserve. Beat your egg wash with water; reserve.

Preheat oven to 375 degrees F. Lightly flour your rolling surface and rolling pin. Take one portion of the dough out the refrigerator (keep the rest of the dough cold until ready to use). Roll out the dough to about 1/8 inch thickness. You may need to use the rolling pin to pound out the dough a bit at the beginning; the dough will be very firm and cold, but will become more pliable as it starts to warm. Just keep rolling with firm, even pressure, and eventually it will look like this:

Rugelach VII

Lift the dough gently from the rolling surface (it may stick a bit) and re-flour your surface beneath the dough.

Rugelach VIII

Replace the dough onto the newly refloured surface. Use a round 9″ cake pan as a guide to make a nice, smooth imprint of a circle in the dough.

Cut the dough into a large circle, following the shape of the cake pan. If you don’t have a cake pan, just guesstimate the size of the circle and cut it as smoothly as you can.

Rugelach X

Form the trimmed excess dough into a small ball. Wrap it in plastic and reserve in the refrigerator, adding to the ball with each batch that is made.

Take 1/4 of the filling (about 4 tbsp) and place it in the center of the circle. Spread it very thin across the surface of the dough; a thick layer of filling will make your cookies expand and burst. You can use your fingers to make the spreading easier; I like to use my palm to flatten and even out the filling. Leave about an inch around the edges of the circle.

Cut the circle into 8 equal triangles by first cutting the circle in half…then quarters…then halve the quarters to make eighths.

If you prefer to make smaller bite-sized cookies, divide each quarter into three to make 12 equal triangles.

Rugelach XIRugelach XIV

Rugelach XIX


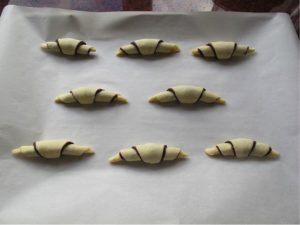
Roll each triangle, starting from the wide flat end and rolling towards the narrow point.

Press the end point into the cookie to secure it. Place the rolled cookies onto a parchment lined cookie sheet, end point down. Leave an inch between the cookies, as they will expand slightly during baking.
Rugelach XX

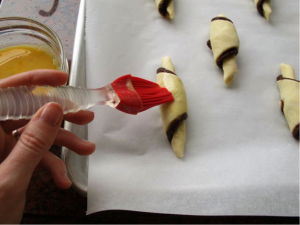
When you are ready to bake, brush the top of each cookie with egg wash…
Rugelach XXI

then sprinkle lightly with cinnamon sugar.
Rugelach XXII

Place cookies in the oven and let them back for about 25 minutes, or until golden brown.

Rugelach XX


Roll out your next batch of cookies while this batch is baking. When the cookies are golden brown, remove from the oven and let them cool on a wire rack.

If you’d prefer to bake more than one batch of cookies at a time, you can store batches of rolled unbaked cookies (without egg wash) on a cookie sheet in the refrigerator. Egg wash and dust them with sugar just prior to placing them in the oven.

When you’re finished making cookies from the four dough balls, make a smooth ball from the leftover dough trimmings you’ve reserved and roll it out to make your fifth batch.

These cookies taste amazing served warm and fresh from the oven. They’ll keep for a few days in a tightly sealed container. You can rewarm them in the microwave if you want to. Also, feel free to use this dough recipe with other rugelach fillings. If you’re using a fruit-only filling, make sure it’s an oven safe variety for pastry baking. Using simple jam or preserves alone (without firming them up with other ingredients) tends to make a runny filling that flows out of the cookies, which makes for a goopy mess. If you’ve never made these cookies before, start with my filling– it’s really yummy, promise!

Happy Holidays!

Visit us at:  www.Etsy.com


October 2015


Fall is finally arriving in The Valley of the Sun and none too soon. This is the most pleasant time of the year to be here and the snowbirds are beginning to arrive before winter sets in .

Oak Creek
Oak Creek

One of the really good things about the fall season is knowing that Starbuck’s Pumpkin Spice is back. Never tried it? Check it out!

Pumpkin Spice
Pumpkin Spice Latte


Fall in Arizona is also the best time of the year to visit the many arts & crafts fairs throughout The Valley. One of the best floating arts & crafts fairs is Briar Patch Marketplace. You can visit their website at: www.briarpatchmarketplace.com

If you have ever considered creating art using the medium of watercolor, Kathy B. has written an article on  Getting Started With Watercolor.  You can also view some of her work at:  www.Etsy.com

We have added a wonderful fall recipe for Stuffed Peppers that has been handed down in our family over the years.

And as always there are a few Jokes & Stories from readers and from around the web. Feel free to contribute by email at:
[email protected]

In This Month’s Issue

Happy Halloween!

Visit us at: www.Etsy.com