Tag Archives: Italian Recipes

Pizzelle

Brought to you by:  dimaggiofamily.com
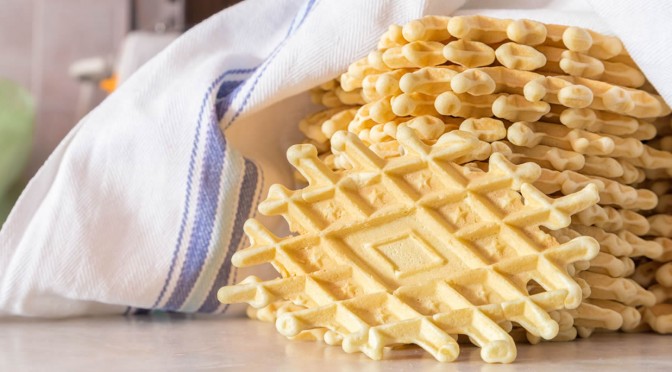
PIZZELLE
Pronounced “pit-sel”

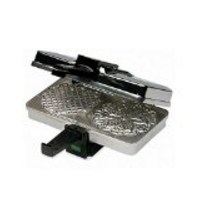
Pizzelles are the oldest known cookie.  It is generally believed they originated in the Abruzzo region of south-central Italy in ancient times to mark an annual celebration. Initially baked over an open fire with relatively simple but effective irons, the early pizzelles often were proudly embossed with the family crest or some hint of the village of origin.  The name comes from the Italian word pizze for round and flat. Pizzelle makers are typically called irons, because the first ones were just that- irons that were forged by blacksmiths for the local women.

Pizzelle Iron
Cucina Pizzelle Iron

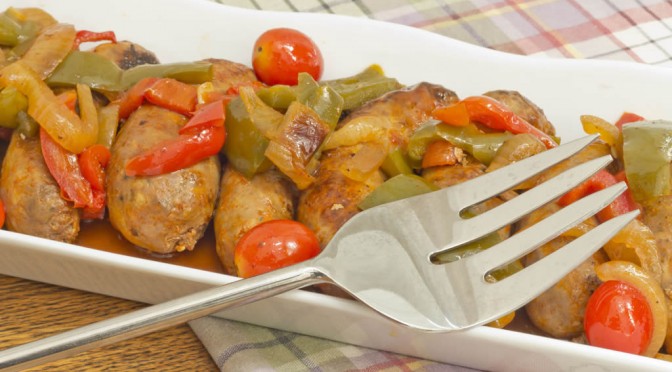
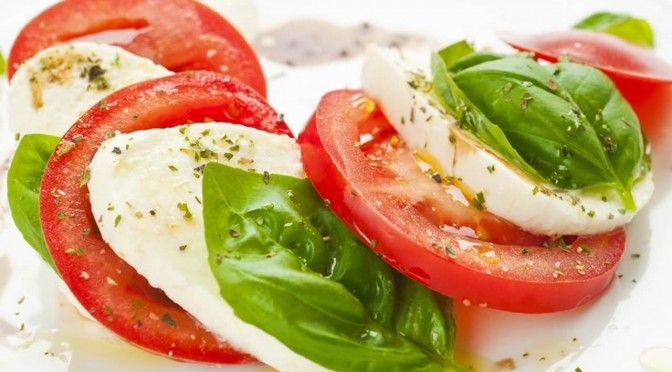
In some parts of Italy, the irons were embossed with family crests and passed down to each generation. Over time it became tradition to use pizzelles to celebrate any holiday or festive occasion, but inevitably there were pizzelles for everyone at Christmas and Easter.  In addition, today they are often found at Italian weddings, alongside other traditional pastries such as cannoli and traditional Italian cookies


Traditional Italian Pizzelles

  • 3 eggs, room temperature
  • ¾ cup sugar
  • ½ cup butter melted and cooled
  • 2 tsp. baking powder
  • 1 tsp. vanilla
  • ½ tsp. anise extract
  • 1 ¾ cups flour

Preparation

In large mixing bowl, beat eggs and sugar.  Add cooled butter, vanilla and anise.  Sift flour and baking powder together and add to egg mixture.   The batter should be stiff enough to be dropped by spoon.  It can also be refrigerated and used later.  Place 1 heaping teaspoon batter on each grid and bake according to directions for your Pizzelle iron.  To keep pizzelles crisp, store in an airtight container.

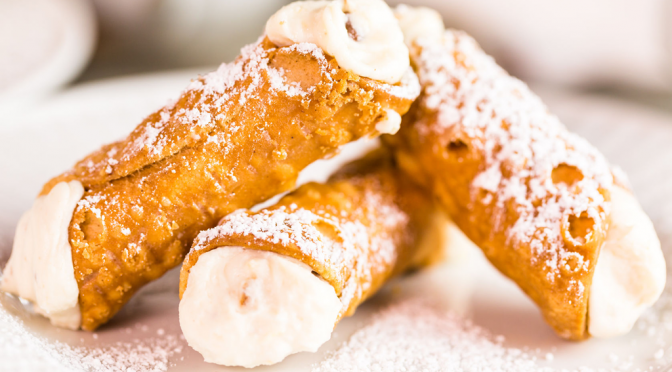
Two pizzelle may be sandwiched with cannoli cream or hazelnut spread.

Pizzelle Roller
Pizzelle Cone Roller


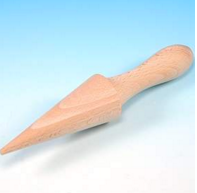
Pizzelle, while still warm, can be rolled using a wooden dowel to create cannoli shells or shaped into cones for ice cream.

Happy Holidays!

<Back      Next>

         Home


Visit our Etsy store for this Holiday T-Shirt.

Visit our online store at: www.etsy.com

Contact us at: [email protected]


The Road Ahead

Aloha,

I usually publish this blog at the beginning of the month. However, this month is special and I wanted to hold off on this post until we closed on the sale of our Scottsdale condo. That closing took place on January 9th. We are now on the entrance ramp to the road (or should I say the ocean) ahead to Maui, Hawaii.

We have been working on our dream of returning home to Hawaii for the last three years. It has been a long haul and a heavy lift but all of the planning is now bringing things together. I will post more on this journey as the months and years unfold.

One of the things we acquired to help get us going when we get settled is a 2017 Ford Edge Titanium which I will review on a separate  page. There is also a section for some favorite inspirational quotes and sayings that helped keep  morale up while setting this plan in motion. And once again we included a favorite recipe that we hope you will enjoy.

Whatever awaits you and yours on the road ahead you choose to take, may the journey be safe and fruitful.

Peace, love and happiness in 2017!

In This Month’s Issue

Visit our online store at: 

 www.etsy.com

Contact us at: [email protected]

live-your-dream

Sausage With Peppers & Onions

A Classic!

This delicious Brooklyn dish is easy to prepare and very satisfying. It is not necessarily a side dish but a meal in and of itself. Makes a great brown bag lunch!

What you need

  • 4-6 Italian sausages. Hot or sweet, you decide. If you live near a Costco, they have some of the best Italian sausage anywhere. Johnsonville is also very good. If you live in an Italian neighborhood then you’ll want to go to a local pork store.
  • A large frying pan
  • Grill
  • Olive oil
  • 2 Green or red bell peppers
  • 1 Medium sweet onion
  • 2 Garlic cloves chopped medium fine
  • 1/2 Tsp salt
  • 1 Tsp black pepper
  • 1/2 Tsp oregano
  • 1/2 Tsp basil
  • 1 Long loaf of Italian bread or crusty French baguette

First

Core and clean the peppers so that there are no seeds and no white rind. Cut them lengthwise into 1/4″ strips.

Second

Cut the ends off the onion and then cut it in half lengthwise and slice so that you have half rings.

Third

Heat the frying pan over medium heat until you can pop a drop of water then add about 1/8″ of olive oil. When you can pop a drop of water in the oil you are ready to fry up the peppers and onions.

Fourth

Saute the garlic on medium heat for about 30 seconds and then add the peppers and onions. Add the salt, black pepper, oregano and basil. Stir everything around often until the peppers and onions are tender. This will take a bit of time.

Fifth

While the peppers and onions are cooking , throw the sausage on the grill and cook them until they are done and have uniform black grill marks all around. Some people like to fry the sausage, I don’t. Frying them is O.K. but it does change the character of the recipe.

Sixth

Take the sausages off the grill and let them cool for a few minutes. Cut them lengthwise and add them to the peppers and onions for about 1 minute. Place the contents of the frying pan into a bowl lined with paper towels to absorb the excess olive oil. You are now ready to serve it up.

This makes a great sandwich and can be served with a side salad and a nice bottle of Chianti.

Enjoy!

Visit our online stores at: www.etsy.com

Contact us at: [email protected]


Cannoli My Way

Easy To Make, Fun To Eat!

First of all, I’m not gonna use home made shells for this recipe. They are a royal pain in the ass to make and take the fun out of the whole deal. So, you food purests can start sending me hate mail and death threats if you’re so inclined. One more thing, after making the filling, licking the spoon is mandatory!

What you need

  • 12 pre-baked, large cannoli shells. You can get these at an Italian bakery or a good gourmet supermarket. Yeah, I know. You can buy the cannoli at the bakery, but what fun is that. And besides, you wouldn’t have any bragging rights if you did.
  • Colander
  • Large bowl
  • An aluminum pan with a cover to store your little works of art in the fridge after completion
  • 2-1 gal freezer bags
  • A nice big piece of cheesecloth
  • 4 cups of whole milk ricotta, not skim (a little extra couldn’t hurt). I like Polly-O brand but any good quality brand will do just fine.
  • 1 and1/2 cups of powdered sugar
  • 1 tablespoon of vanilla
  • 1/2 cup of finely chopped Maraschino cherries

First

Empty the ricotta onto the cheesecloth and let it drain in a colander for a few minutes so that it is not watery.

Second

In a large bowl, combine the ricotta, powdered sugar and vanilla until well mixed.

Third

Finely chop the Maraschino cherries and squeeze them into a ball in a paper towel until they are almost dry. If you don’t do this you will have a pink filling.

Mix the Maraschino cherries into the filling.

Fourth

Equally fill each 1 gal freezer bag with filling. After filling the bags, cut about 1/4 inch off each corner.

From this opening, squeeze the filling into each shell. It is very important to make sure that the filling penetrates the shell completely so that there is no air in the center. Fill the shell from both sides and then flatten the end of the filled shell with a butter knife.

Fifth

Place the filled shells in the aluminum pan and sprinkle liberally with powdered sugar. If you’re not gonna serve them immediately, place them in the fridge, but not for too long or they will get soggy.

Make a cup of coffee and lick the spoon.

lick-the-spoon

Yum!

Visit our online store at:  www.etsy.com

Contact us at: [email protected]


Pignatelli’s Ellis Island Vinaigrette

Easy To Make

I have been making this family vinaigrette recipe for decades and sometimes bring a bottle of it to friends’ houses when visiting. I like it so much that I thought I would share the recipe with our readers.

Caprese
Tomato Caprese


What you need

  • A wine bottle or any bottle that will hold about 25oz (750ml)
  • 1 cup balsamic vinegar
  • 1 cup olive oil (not extra virgin)
  • 1 cup bottled or filtered water
  • 2 cloves of finely chopped garlic
  • 1/2 tsp salt
  • 1/2 tsp black pepper
  • 1/2 tsp oregano flakes
  • 1 tsp parsley flakes
  • 1 tsp dried basil

First

Get all of your dry and chopped ingredients into the bottle

Second

Using a funnel, pour the water, olive oil and  vinegar into the bottle

Third

Tightly cap or cork the bottle and shake it well. Let the mixture sit for a day so that the flavors can blend.

This will go great with a caprese salad or just a plain old lettuce and tomato salad. You’ll want to have some fresh, crusty bread for mopping.

Enjoy!

Pignatellis Label Opt

Visit our online stores at:  www.Etsy.com

Contact us at: [email protected]

My Mother’s Famous Meatballs

I recently posted a recipe for gravy. This recipe is the companion to the gravy recipe. These are really good!

Meatballs

Ingredients

1lb-Chopped veal

1lb-Chopped beef

1/2lb-Chopped pork

½ tsp-salt

1 tsp-pepper

2 tblsp-Grated Romano cheese

2 tblsp-Pine nuts

Fresh Parsley to taste

2-eggs

2-Cloves of crushed, fresh garlic

½ loaf-stale Italian bread

Olive oil

 First: Soak the stale bread in water and when thoroughly soaked, peel off the crust and squeeze with all your might until all the water is removed.

 Second: With very clean hands, mix the meats and all the other ingredients together until you have a nice, well-mixed mound of meat.

 Third: Heat a large frying pan until it is very hot. When the pan is sufficiently hot pour in the olive oil (about 1/8 of an inch deep). When a drop of water can pop in the oil you are ready to cook.

 Fourth:  Keeping your hands slightly wet with water, form the meatballs. Not completely round but slightly oval so they will cook through. Place them in the hot oil and when they are browned on one side turn them over and brown the other side.

Enjoy!

Visit us at: www.Etsy.com

October 2015


Fall is finally arriving in The Valley of the Sun and none too soon. This is the most pleasant time of the year to be here and the snowbirds are beginning to arrive before winter sets in .

Oak Creek
Oak Creek

One of the really good things about the fall season is knowing that Starbuck’s Pumpkin Spice is back. Never tried it? Check it out!

Pumpkin Spice
Pumpkin Spice Latte


Fall in Arizona is also the best time of the year to visit the many arts & crafts fairs throughout The Valley. One of the best floating arts & crafts fairs is Briar Patch Marketplace. You can visit their website at: www.briarpatchmarketplace.com

If you have ever considered creating art using the medium of watercolor, Kathy B. has written an article on  Getting Started With Watercolor.  You can also view some of her work at:  www.Etsy.com

We have added a wonderful fall recipe for Stuffed Peppers that has been handed down in our family over the years.

And as always there are a few Jokes & Stories from readers and from around the web. Feel free to contribute by email at:

[email protected]

In This Month’s Issue

Happy Halloween!

Visit us at: www.Etsy.com 


Stuffed Peppers

This takes some time and a little effort to prepare, but it is well worth it.

What you need

  • A nice sized stew pot and cover
  • 4 well shaped, symmetrical peppers (green, red, yellow or a combination)
  • 2 large eggs
  • 1 cup of Progresso Italian Style breadcrumbs
  • 2 Garlic cloves
  • 1 cup of chopped spinach (frozen works great – thawed and drained)
  • 2 cans of chicken broth
  • 1/4 cup of grated parmesan cheese
  • 1/2 tsp of salt
  • 1tsp of black pepper
  • 2tsp of parsley flakes
  • 1tsp basil
  • Olive oil

Serves 4

First

Cut the tops off the peppers and core them. Be sure not to leave any seeds or white spines. Rinse thoroughly and set aside.

Second

Finely chop the garlic and combine with eggs, breadcrumbs, spinach, cheese, salt, pepper, parsley, parmesan and basil. Knead into a moist, well mixed mound.

Third

Stuff each pepper to about a 1/4 inch below the top. Insert a sliver of garlic in the center of each pepper and sprinkle some grated parmesan on top.

Fourth

Pour the broth into the stew pot and place the peppers upright in the pot and drizzle some olive oil over each one. Cook 30-40 minutes over medium heat until the peppers are soft but not mushy. The pot must be covered and the peppers basted frequently with the broth. Remove the peppers and let them settle for a few minutes.

This dish is very, very filling and need only be served with a salad, French or Italian bread and a nice Chianti

divertiti!

Visit us at:  www.Etsy.com

Caprese Salad

I love this dish! It is so very easy to prepare and very satisfying as either an appetizer or entree.

What you need

  • A nice sized serving platter
  • 1lb of fresh mozzarella
  • 3 Large , ripe, firm tomatoes
  •  A fistful of fresh basil(enough for about 12 good sized leaves)
  • 24 black, pitted olives
  • A small jar of sliced roasted peppers in olive oil
  • 12 Artichoke hearts in olive oil
  • Olive oil
  • Balsamic vinegar
  • Salt
  • Ground pepper
  • Oregano

Serves 4-6

First

Cut the mozzarella into 12 slices about 1/4 inch thick and distribute the slices evenly around the serving platter. Sprinkle with a little salt and ground black pepper.

Second

Cut the ends off of the tomatoes and put them aside. Carefully slice the tomatoes into 4 thick quarters so that you are left with 12 healthy slices.

Third

Place the sliced tomatoes on top of the mozzarella slices and sprinkle with a little salt and some oregano. Place a leaf of fresh basil on top.

Fourth

Chop up the ends that were cut from the tomatoes and use them as a base for the black olives. Place the black olives and chopped tomatoes, roasted peppers and artichoke hearts in the center of the serving platter. Coat the basil, tomatoes and mozzarella with some olive oil and balsamic vinegar and you are ready to serve. You’ll need steak knives and forks.

A nice crusty loaf of warm bread and a bottle of wine tops things off.

Enjoy!

Visit us at: www.Etsy.com


Tasty Tilapia

Healthy and Delicious

This dish takes about 45 minutes from prep to finish. Tilapia does not have its own distinctive taste and lends itself well to whatever seasoning and flavoring you choose. This recipe is straightforward, easy to prepare and low in calories.

What you need

  • A broiler pan (the kind you find in most ovens)
  • Aluminum foil
  • Canola oil cooking spray
  • 4-good sized tilapia fillets or loins (I like the frozen variety, after defrosting, they taste more fresh).
  • 4-Cloves of finely chopped garlic
  • Extra virgin olive oil
  • 8-Thin pats of real butter
  • Salt and ground black pepper
  • Parsley flakes
  • 1-Lemon

First

Pre-heat your oven to 400 degrees. This is a very important step.

Second

Line the bottom of the broiler pan with aluminum foil for easy clean up. Leave the top grate uncovered. Spray the top grate with the cooking oil so that the fillets don’t stick.

Third

While the oven is heating up, rinse each filet under cold running water and pat the excess water off with paper towels.

Fourth

Place the fillets on the cooking spray coated grate and drizzle some olive oil over each filet.

Salt and pepper to taste and add some of the chopped garlic on top of each filet.

Place 2 pats of butter on each fillet and then sprinkle some parsley flakes on top.

Squeeze the lemon juice over the fillets

Place the pan in the pre-heated oven and cook for 30-35 minutes.

This is nicely served over a bed of rice with cooked green veggies on the side.

A good pinot grigio adds the finishing touch.

Enjoy!

Visit us at: www.Etsy.com